8 DIY Wood Burning Patterns You Can Create Today with Pictures
Table Of Content

Change out your butcher paper when it starts to get discolored to make sure you don't accidentally reapply any "ghosted" ammonium chloride gel back onto the wood. Use a weeding tool to help remove any little bits of vinyl stuck to the wood. Make sure you apply the gel to all the parts of the wood showing through the stencil. Once everything is covered with a light coat, let it dry completely, about 10 to 20 minutes. Make sure the gel doesn't get on any part of the wood you DO NOT want to burn.
Understanding The Mesmerizing Appeal Of Burnt Lightning Patterns
A wire brush will remove char and soot faster than a nylon brush, but can leave behind large scratches (tool marks) on the wood’s surface. Although that may sound undesirable, these tool marks can add extra character to rustic design projects. We’ll cover everything from visualizing and planning your design to sketching it on the wood surface, and finally, the techniques for burning intricate details. If you love drawing mandalas or coloring them, this is one of the wood-burning designs for beginners to copy.
Etched Wooden Spoons by Design Mom
In addition to their rustic appeal, the pieces generate a tribal look. Undeniably, this wooden serving tray makes a unique housewarming or wedding gift. Due to its practicality and beauty, I guarantee the recipient will adore it. Furthermore, wood burned initials give the handiwork a sentimental value. Instead of coating a wooden photo frame with paint, consider wood burning.
Types of Wood Paneling
We need a heat gun to burn the design into the wood and something to sand the wood like a sanding sponge. Adding wood paneling to walls costs between $1,000 and $15,000, according to data from Angi that's based on a 12-by-12 room. The price goes down or up depending on the panel materials you choose. Real wood is more expensive than faux wood-look vinyl or laminate paneling. MDF or plywood will be on the lower end of the price range for natural wood, while more exotic real woods could cost you upward of $40 per square foot. Wood paneling can be a great way to embrace the history of your home when you choose a period-appropriate style, designer Britt Zunino of Studio DB in Manhattan says.
Circular Wood Burned Pendants
The resulting effect creates an authentic and aesthetically interesting finish for furniture, flooring, and decor items. In this article, we’ve covered the essential materials and tools needed for wood burning, how to set up a proper workspace, and the basics of wood burning techniques. We’ve also provided a step-by-step guide to creating your wood burning project, as well as tips and tricks for successful wood burning. To improve your wood burning skills over time, practice regularly and experiment with different techniques, tips, and materials. Seek out tutorials, books, or classes to learn new methods and gain inspiration from other artists. As you gain experience, challenge yourself with more intricate designs and projects to continue refining your skills.
Tips for Taking Your Burn Wood Designs to the Next Level: Adding Detail, Texture, and Color
As mentioned I will show you how to assemble the Santa Cookie Tray first, but you will follow the same steps to cut the vinyl for the "Grillin' and Chillin'" design. I used basswood with a natural bark edge, but you can use any wood you want. Just make sure the wood is unfinished with no stain, paint or wax. And if you want a fresh cut but are reluctant to make too drastic of a change, consider a lob or a bob that sits above the shoulders. No, wood paneling, whether real wood or faux laminate, is more expensive than standard drywall alone.
Wood Paneling FAQ
Jennifer Marx is a designer, an enthusiastic crafter, a lifelong teacher, and a proud overcomer of a variety of life's challenges. In her spare time she loves to play D&D and video games, garden, sew costumes, and go to Disney. You can use a weeding tool to help remove any little bits of vinyl stuck to the wood. If you need help centering your stencil you can measure and mark the center point of your wood with a pencil. Then fold your vinyl into a taco “U” shape and line up the bottom of the “U” over your center mark. Gently press the vinyl down starting in the center and working outward.
Understanding the mesmerizing appeal of these patterns can help us appreciate the artistry behind this woodworking technique. Discover the captivating technique of burning lightning into wood with our expert guide. Learn how to create intricate designs and patterns using this unique and mesmerizing art form. Unleash your creativity and transform ordinary wood into stunning works of art. Designs wood burning ideas aren’t just for furniture and ornaments. You can apply them to create personalized wooden pendants, too.
The Latest Design Trend: Black and Burned Wood (Published 2017) - The New York Times
The Latest Design Trend: Black and Burned Wood (Published .
Posted: Tue, 19 Sep 2017 07:00:00 GMT [source]
There are numberless ways to incorporate some emotional depth into any living space. It surely begins with ornaments that deliver a sentimental value. If you appreciate simple objects, consider wood-burned decorations. Robert Johnson is a passionate furniture maker & carpenter, sought after for his knowledge on the craft. Other than those, lumber selections like Snakewood and Blackwood don’t suit this woodworking technique.
I applied only a SMALL amount hoping it wouldn’t bleed under the stencil this time. I tried making my Grillin’ and Chillin’ sign using a Scorch Marker. My first attempt wasn’t very successful because it bled under my stencil —the marker is almost a watery consistency so it’s not really surprising that it bled. Use your fingers again to make sure the vinyl is securely adhered to the wood without any noticeable bubbles. You want to make sure it is firmly adhered to the wood since it’s a stencil and you don’t want any bleeding to occur. The first step is to download my Wood Burned Designs from my free resource library -- it's design #357.
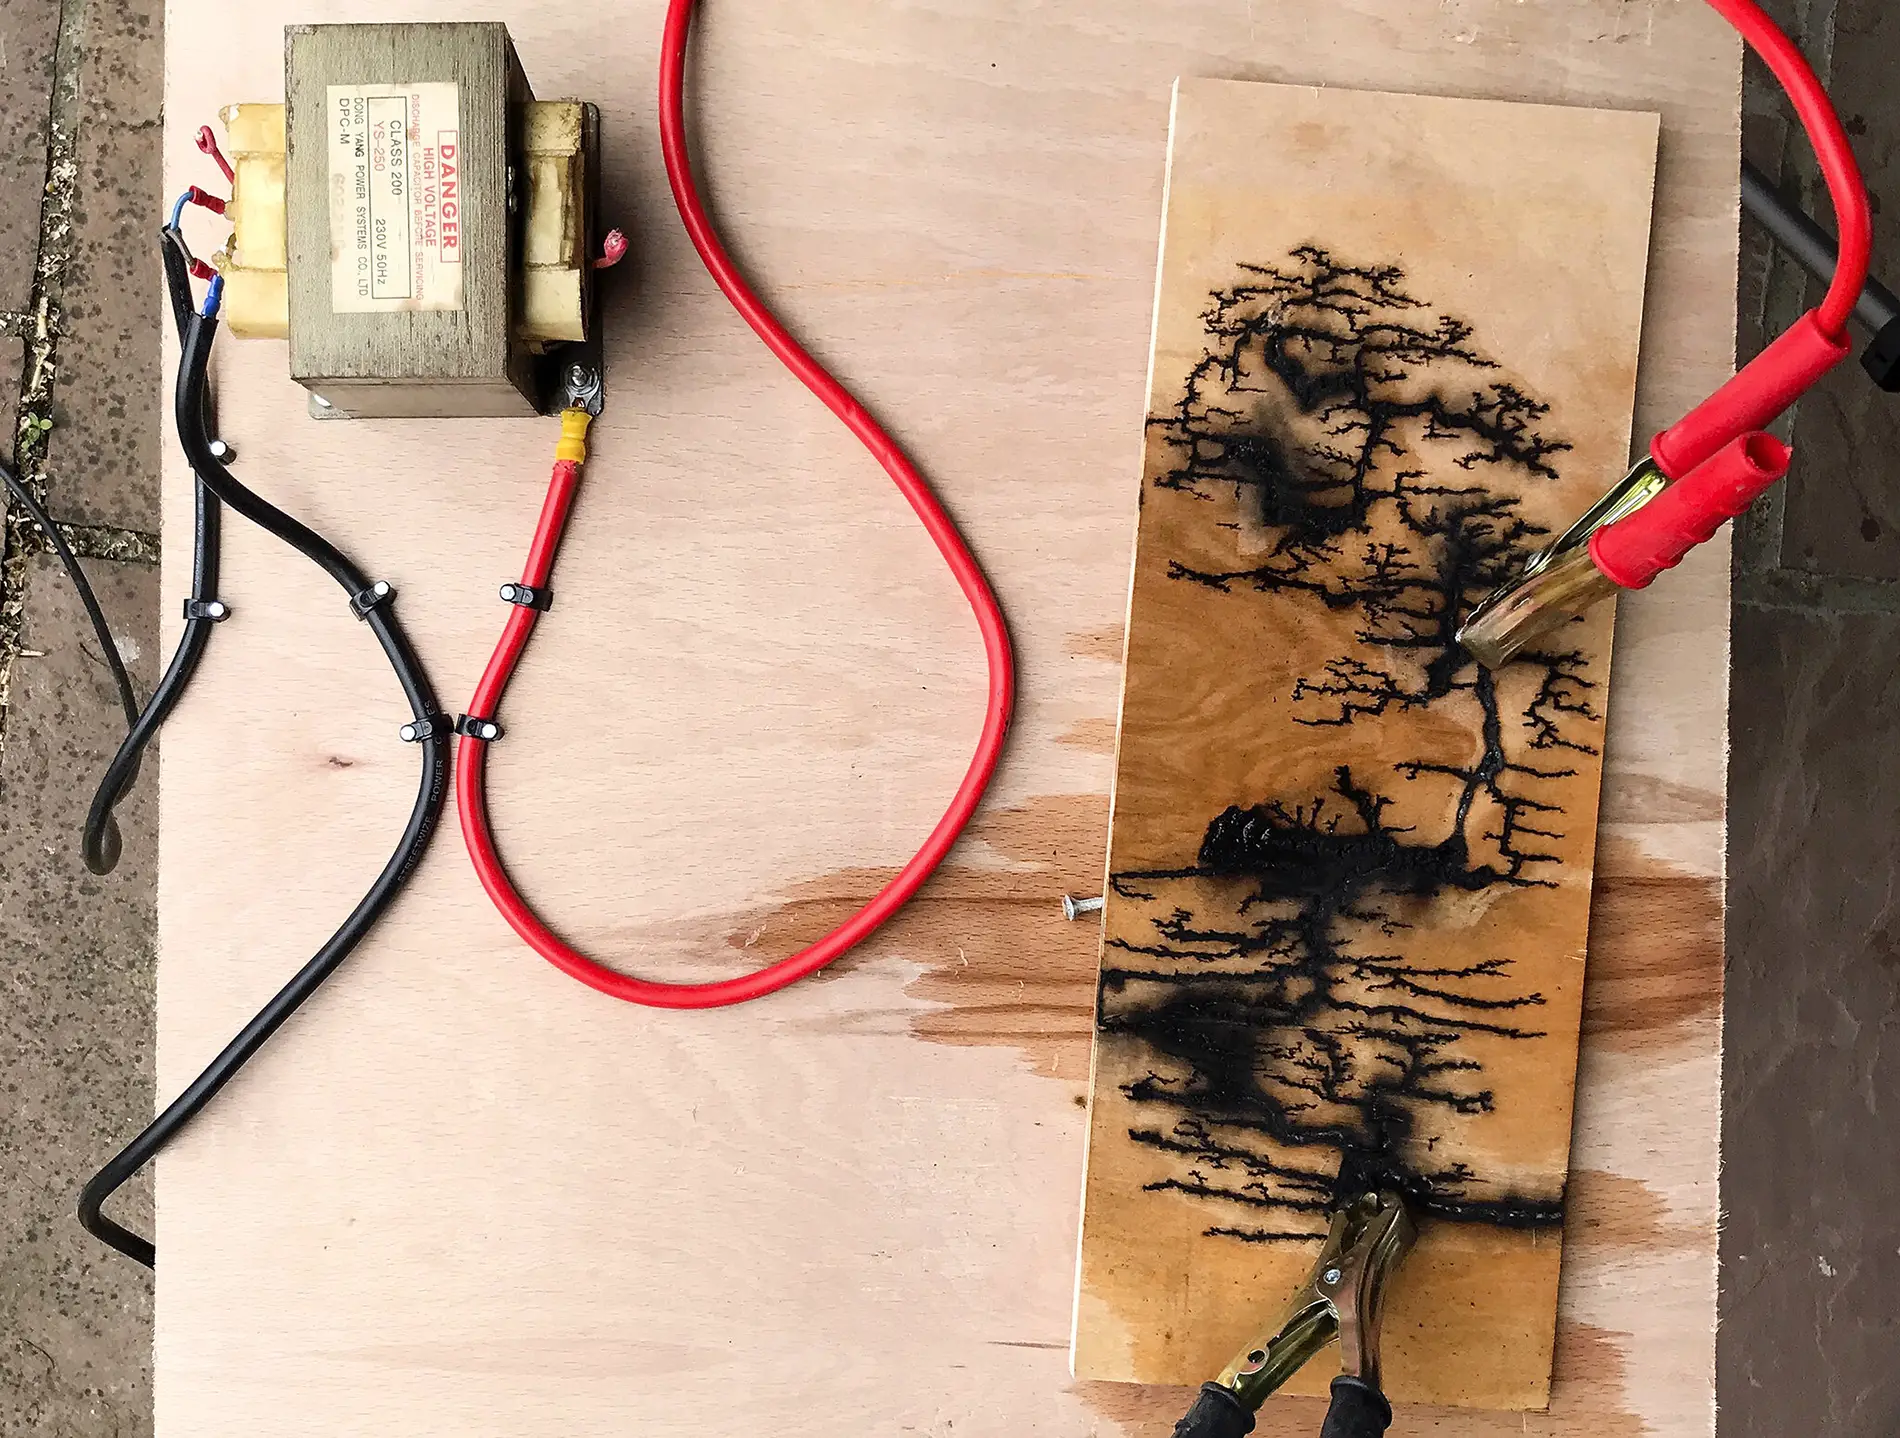
Lastly, a fire-resistant surface, such as a metal sheet or ceramic tile, provides a safe working area and reduces the risk of unintentional fires. I used the hottest setting on my heat gun which is about 650 degrees Celsius. I added the extra heat because my wood tray is very thick, and I found that the thicker the wood, the more heat you can apply to speed things up.
Wainscoting is more about where the wood is placed on the wall rather than the specific type of paneling used. Raised panel, V-groove, shiplap, and beadboard, among other paneling styles, can all be used as wainscoting. Finally, only perform this process in a well-ventilated area to avoid inhaling any fumes. Working outdoors or in a garage with the garage door open is best. The type of wood, torch, and brush you use will impact the appearance of your final product, and the amount of work involved.
You want to remove all the parts you want to burn into the wood (which are the parts you would normally leave on the carrier sheet). Be extra careful that all the small pieces and centers to your letters stay on the carrier sheet. If you want to make an exciting and beautiful wood-burning design, think about making this stunning mandala pineapple pattern. It’s definitely not for the faint of heart, as it requires a great deal of patience and determination due to the number of advanced details.
"You can some fun switching up the part, tossing the hair over to one side or adding a swooping curtain bang for added drama." Wood paneling isn't specifically for dulling or dampening noise, it can help reduce noise because it's an added layer on top of the drywall and insulation. Wood paneling is not completely noise canceling or acoustically sound. You'll see minimal to no grooves or decorative elements as flat paneling is traditionally flat strips of wood placed together to create a paneled effect.
For this technique, use a tracing tip (like the spear-shaped one) as if you were drawing any other line. Work with this idea to create contrasts against shiny gradients. Filling in black is always easier than making gradients, and can be just as beautiful. For large surfaces, I recommend a flat gradient tip in medium to high heat (see Targaryen crest). For small areas, the calligraphy pen is really great (see Owl). This tip leaves little walls flanking each line, for being enough sharp to lift the wood around the trace.
You’ll need a wood burning tool, some tracing paper, a pencil, a sharp knife or X-Acto knife, and a piece of wood that you’ll be burning your design onto. This pen has special tips that can easily scorch the surface of the wood. Choose one that works with your level of experience with this form of wood art. To burn a pattern into wood, use a wood burning tool to create the design. Then, carefully trace the lines with the wood burning tool, applying even pressure.


Comments
Post a Comment